dmaxsba2408
-
Posts
1,159 -
Joined
-
Last visited
Everything posted by dmaxsba2408
-
RCT2 Lost Objdata Help Thread
dmaxsba2408 replied to Stoksy's topic in Roller Coaster Games, Models, and Other Randomness
^ here ya go AE-DINVT.zip
-
Official RCT/RCT2 Help Thread
dmaxsba2408 replied to Stoksy's topic in Roller Coaster Games, Models, and Other Randomness
Ok, to make the purple one invisible all you need to do is go into 8cars and switch the track type to Crooked House and put a check in the Make Invisible box. Hit apply. -
Official RCT/RCT2 Help Thread
dmaxsba2408 replied to Stoksy's topic in Roller Coaster Games, Models, and Other Randomness
^nope you have to change modes, only Crooked House and Circus Show allow the invisble button to work. If I read all that (^^) correctly, the purple track is the one the coaster is really using right?, but the yellow one is fake. However it's the one that the trains look like they are on RIGHT? I need to know what's what before I can tell you what to do. -
AJ Adventure Land [RCT2]
dmaxsba2408 replied to Millenniumfan94's topic in Roller Coaster Games, Models, and Other Randomness
It is a aggravating issue, but it can be fixed 99% of the time. It requires using both 8cars and SOB trainers at the same time. Once the park has glitched out and it no longer is fully responding to the order to "Restore Clearances" you need to save your game and exit out, close out 8cars also. Now restart your game and then start 8cars again and this time also start SOB trainer. Using SOB go to Landscape and 0 clearance the park. Wait... about a minute and then go to 8cars and use it's Restore Clearances. Now go back to the game and the problem should be gone. Warning: Try to avoid running both trainers together for long periods of time, they can Error Trap your park. Do what you need to do and then close one out, DO NOT continue playing RCT2 with both running in the background. -
My only suggestion is to do a separate exit station for Bolt. If you do that you can easily change that large curve into a smaller one so you can put in a straight section of track. What I am talking about is running like 4/5 trains on the ride. If you place a block brake one train length off the entrance station the train will roll out and stop waiting for the next block to clear. The next train will enter the station. By adding in a single block right before the station the next will pull up right behind the one loading, one will be in the center of the curve and one will be in the exit station unloading. Build another block on the back of the exit station. When that block clears the train on the launch track will leave. It will give the ride that TTD look with trains stacked up waiting to get loaded and unloaded.
-
Good choice on the name change to San Francisco, with the hills and climate of the area just about any kind of vegetation expect cactus will work. It never gets cold enough to kill off most tropical plants and of course there are hills everywhere. As for going from BMP to JEPG, well we all know that RCT2 always saves it's picture as BMPs. It does that so the pictures can be handled in most if not all Windows PAINT programs. When you open one of the BMPs with a previewer there should be a Paint icon at the bottom. If you click it, the Picture will now be in Paint and you can crop the picture to show only what you want. Add highlights and text to bring attention to certain items and so on. When your done just hit SAVE AS and choose JEPG. If you want you should also be able to go directly to Paint just by right clicking on any BMP and selecting Open With and then choose Paint. Your pictures will load almost instantly for anyone who looks at your topic and you can mix up the sizes and shapes of the pictures to bring in some variety.
-
Been seeing a lot people lately using Arrow track with the games Mine Coaster, Arrow Hyper trains on Mine Coaster track and Arrow Hyper trains on Arrow track as alternatives to the standard Disney-ish mine train or make up for the lack of a 3 seat Arrow style mine train. I just want to put this out here and ask is there a demand for a Arrow type 6 seat mine train like those seen at most theme parks or is everyone happy with just mixing it up the way they are. I have been playing around with the idea of making an Arrow type 6 seat mine train and just like most if not all Arrow mine trains, this one will not have a train engine as the front car but just a regular car. I guess I could do both one with a train engine and one without. Anyway, like the look of that last picture. It's just FUN!
-
No problem, I can't wait to see what you come up with for your park.
-
RCT2 Lost Objdata Help Thread
dmaxsba2408 replied to Stoksy's topic in Roller Coaster Games, Models, and Other Randomness
Darnit, missed one. Thanks djbracace. I'll update the zip. -
RCT2 Lost Objdata Help Thread
dmaxsba2408 replied to Stoksy's topic in Roller Coaster Games, Models, and Other Randomness
I need the following files please: SMALL SCENERY TTPRFA01 TTPRFA02 TTPRFA03 TTPRFA04 TTPRFA07 TTPRFA08 WALL 11 1A PATH JATIPBg Many of us here at TPR have been trying for about a year now to get a few parks/coaster parks open made by a fellow member by the name of THELEGENDARYMATTHEW (TLM). One of the problem parks was called Sunrise Point. Well thanks to the wonderful people over at RCT2 Objects List (olddtfan51) and a New Element member by the name of K0NG today I was finally able to get the park to open. I don't know why TLM hasn't been around TPR much lately, guess I should have asked him the other day when we ran into one another at one of my YouTube videos. But I didn't think about it. Anyway here is one of his projects that was lost due to a computer issue. ENJOY. SUNRISE POINT is probably one of TLM's best works, and I hope if he stops by he picks it up and finishes it. The park now has the EXPORT PLUG-INS checked and I have a separate ZIP file full of all the custom rides/stalls used in the park. There are a couple of large scenery items in the park that I am not sure of there exportability so if the park will not open after you put the rides in please let me know. I am also including a version of Sunrise Point that I spent several hours in fixing up the place. If you spend some time in the original and then the "FIXED" version I am sure you will see the differences. The list of items at the top are what I am still missing in order to get TLM's recreations of Holiday World's Voyage and Dollywood's Thunderhead to open. Any help would be much appreciated. Sunrise Point.zip Sunrise Point (Fixed).zip Sunrise Point Rides.zip Updated, thanks djbrcace -
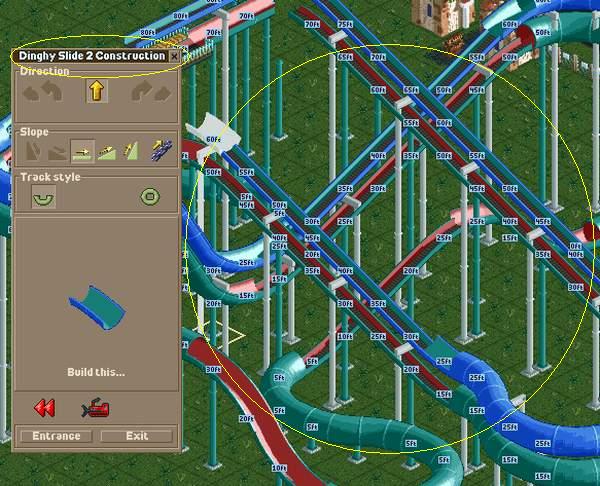
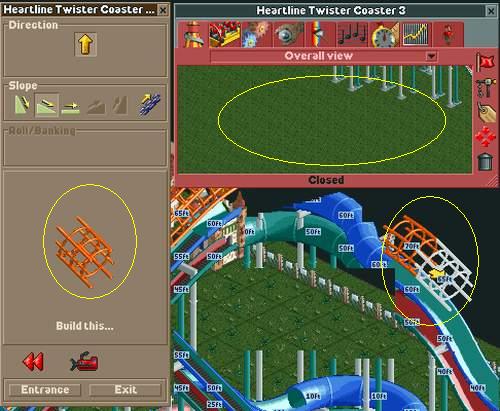
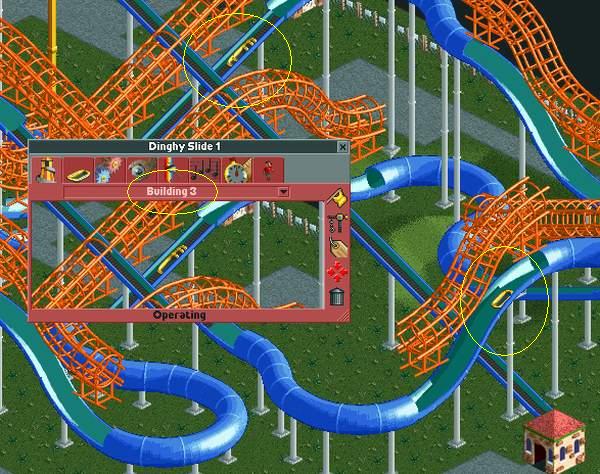
It's looking like you do not have a complete circuit. Since the rafts are in Boat Hire Mode they are getting to the end of the ride and going in circles like they would out in open water. I am going to assume that a section of invisible track is not connected at the end of your ride. OK, here is what you need to do... 1) NEVER work on an invisible track or a track that is lowered on top of an invisible track, it can ERROR TRAP. 2) Raise the visible (fake) track back up 2 notches, by that I mean go into 8cars and change the number to +2 instead of -2, select the color and put a check in the box for Raise or Lower. Don't worry about the Heartline Twisters, just leave them alone. 3) Make the invisible track visible again, you can do this by changing the ride back to it's original properties. Which would be Continuous Circuit Mode, and Dinghy Slide, un-check make rides invisible and hit apply. Now the ride should be visible again. Look at the end of your track and see if your missing any sections if so build them back. After you done, test the ride as it is. Just leave the other track above it. It should make a complete circuit. If it did... 1) Go back to 8cars and make it invisible again by putting check in the Make Rides Invisible box and changing the rides properties back to Boat Hire Mode and Crooked House, then apply. 2) Test it again. Now the rafts should be called buildings again and be floating in the air under the raised track. 3) Now you need to lower the raised track back down. Once it's back down you should be done. If this did not solve the problem please PM the park to me and let me look at it in person. Hope these little set backs have not deterred you from this project, I promise once you do it a few times it really is easy and these kinds of problems are just part of learning "How To" do things. Before you know it you will be doing it without even thinking about it and it will work every time.
-
Project S (RCT2)
dmaxsba2408 replied to Stoksy's topic in Roller Coaster Games, Models, and Other Randomness
Wow, I am really liking what your doing with ride. No offence to all your previous work in RCT2, but this blows everything you have ever made away! BTW, I got Sunrise Point to open I will post it in the Lost Object Thread. -
Yep, sometimes the trainers and the game just will not play well together. I have had it happen with other projects. There are several things you can try; ...make sure you are selecting the right color scheme each time. ...the raise/lower box is checked each time. ...close everything out and start it all up again. ...switch to a different version of 8cars ...remove the tracks that will not do what you want and rebuild them. If non of those work please PM me your park and let me have a look at the problem. 2 Basic Water Items.zip In this zip are 2 basic water items that can be used with all water slides AWWC is a 0 clearance 1/2 quarter white water tile and LVWATER1 is a quarter tile slope water fall.
-
Official RCT/RCT2 Help Thread
dmaxsba2408 replied to Stoksy's topic in Roller Coaster Games, Models, and Other Randomness
^^^ If for some reason your new scenery in not being removed after you uninstall RCT2 you can just follow the path you used to put in new scenery items to remove all the RCT2 folders by hand to the recycle bin. Once done reinstall the game and it should be back to when you first started the game. -
Adventure Beach [RCT2]
dmaxsba2408 replied to Kraken & Manta's topic in Roller Coaster Games, Models, and Other Randomness
Is Atari where all you new players are coming from? I knew a few of you were, but all of you? Really don't care, just so happy to see more and more new players posting such high quality stuff here. The story and pictures are all wonderful, I do agree about the station entrance suggestion. -
^ that is a GREAT idea, never thought of that. I put a note in the area of the "How To" for everyone to see your post.
-
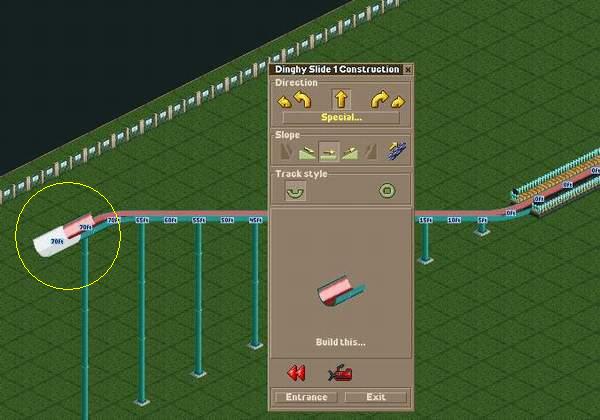
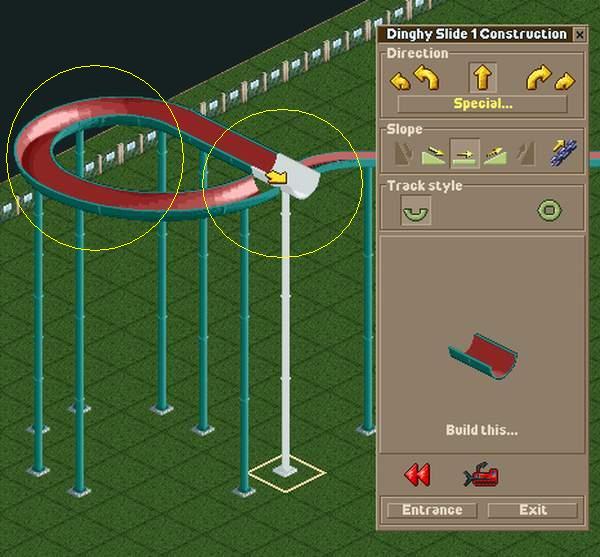
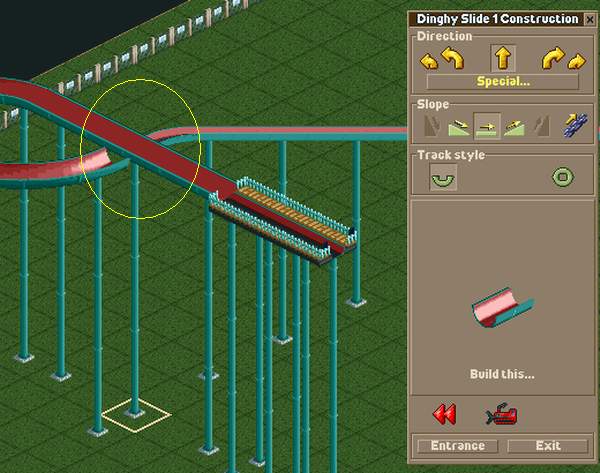
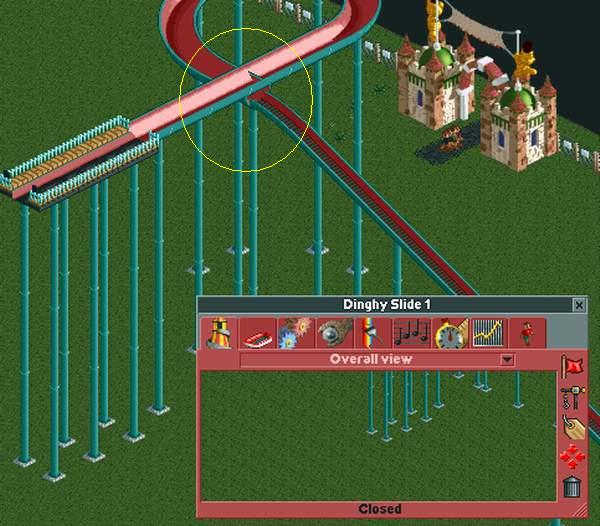
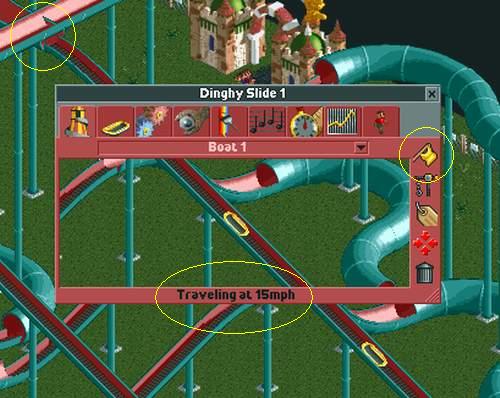
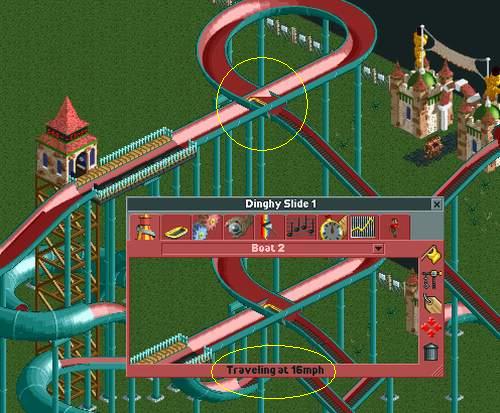
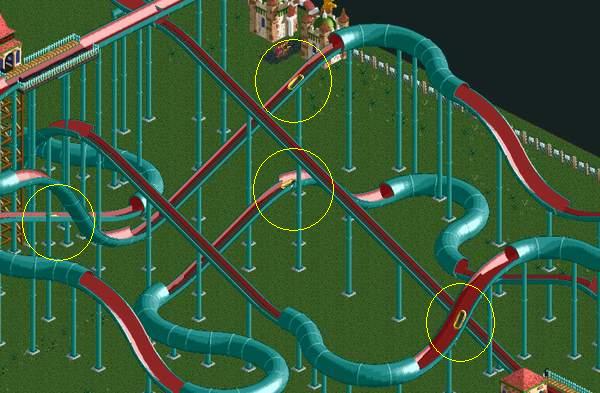
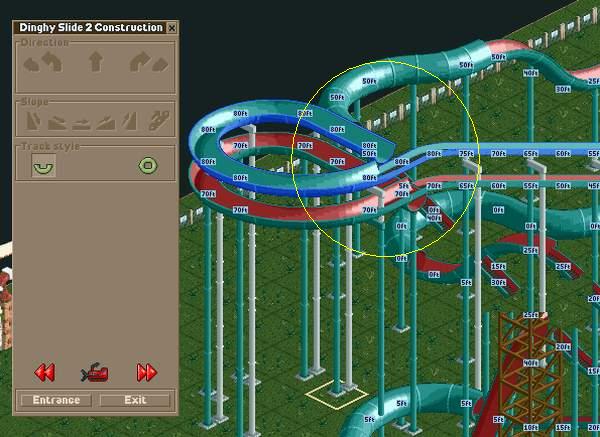
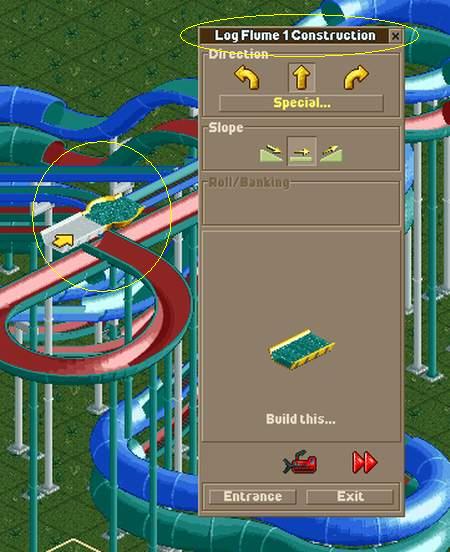
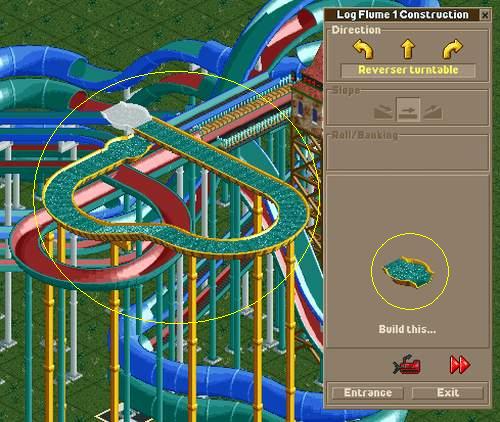
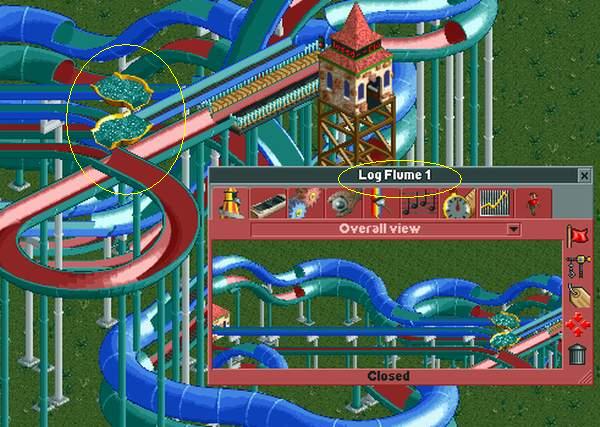
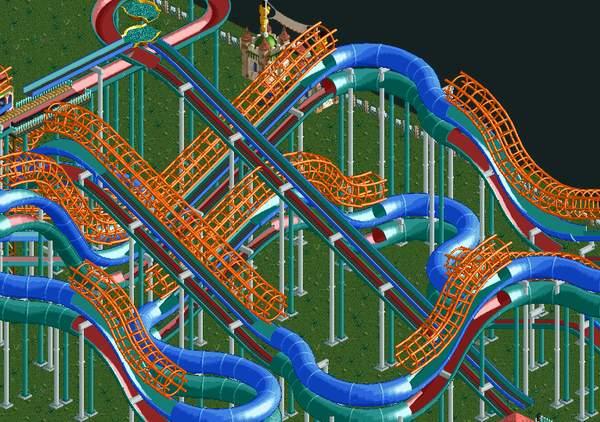
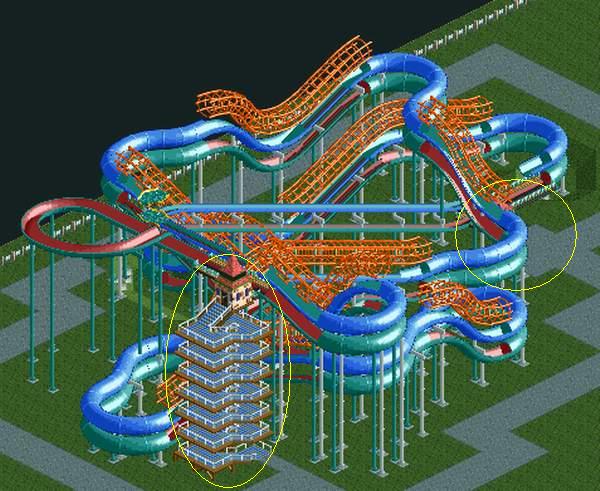
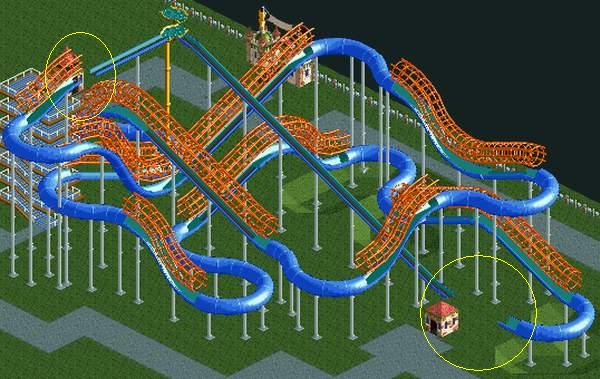
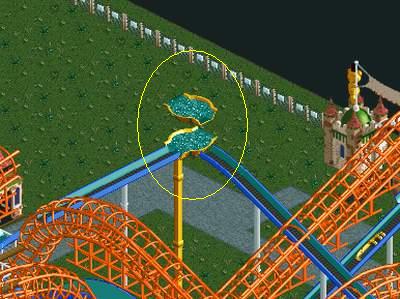
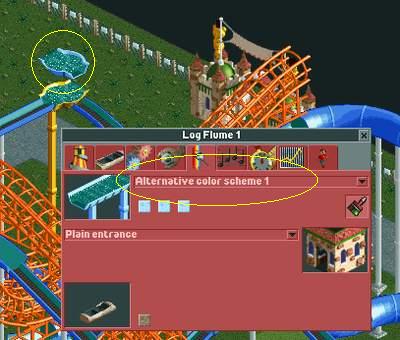
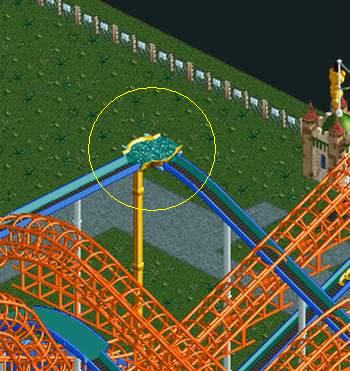
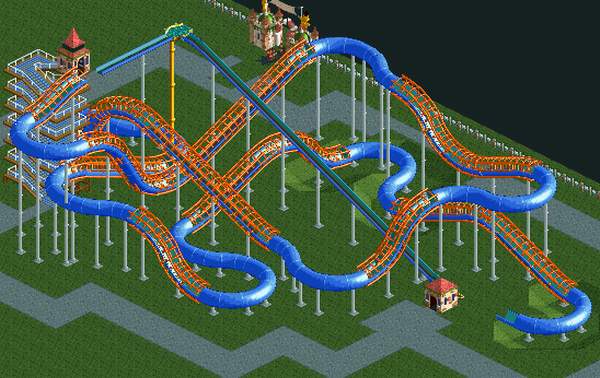
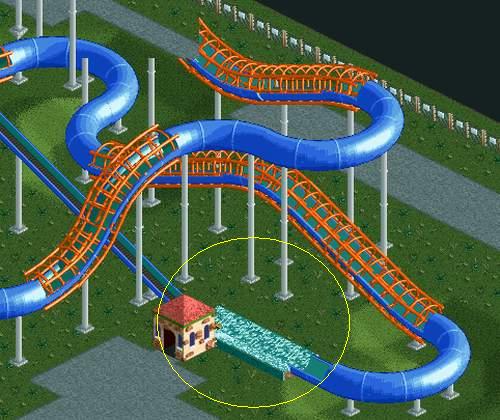
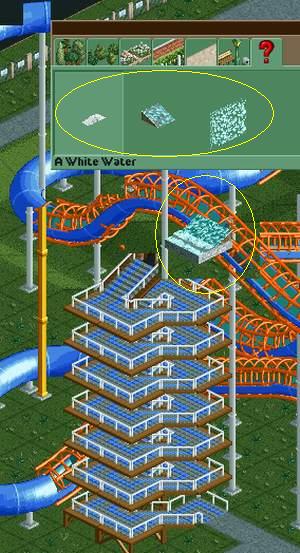
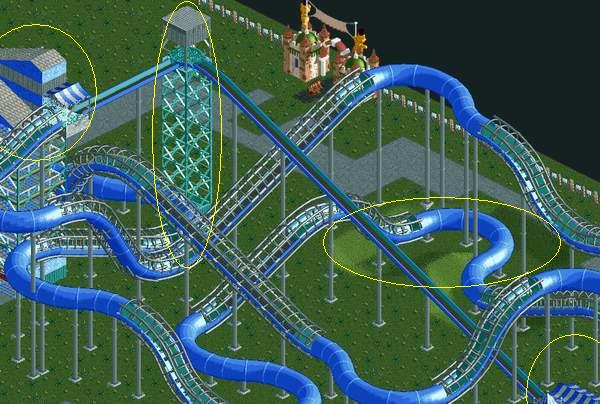
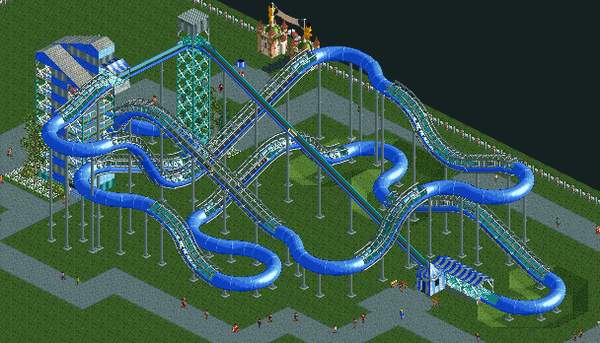
Well, I have had this done for a while, so long in fact I lost the test park I made showing the Water Coaster working during an RCT2 reboot. Thought I saved it but it turns out all I saved was the pictures. So anyway here is how you make a full capacity working Water Coaster in RCT2. To build this ride you will need: Dinghy Slide Heartline Twister Log Flume (optional) Water scenery items of your choice 8cars Trainer SOB Trainer (optional) OK, here we go. EDIT: There is also a "How To" for making a basic Water Slide that looks like what a water slide should look like HERE. It is full of good information and a great way to start any water park project. Topics covered are of invisible rides and their affect on paths and Error Trappers caused by doing the wrong thing at the wrong time with 8cars and several other issues that can come up while doing things in RCT2 that were never meant to be done. It is good practice for this "How To", so I would start with the basics first and it doesn't get much more basic than a simple water slide. 1)Start out with the end of the ride and build a lift to the height you will want the ride to start at. Build the station long enough to get at least 4 rafts. If your not going to make a turn table type of layout skip ahead to the upper station part of this "How To" TOO. 2)Build a single straight section at the top of the lift and continue around till you run back into your single straight section. Now remove that section and build through where it was. 3)Continue through and make your upper station. Go back to your lift and get ready to replace that section of straight track you removed. 4)Exit to 8cars and 0 clearance absolute. Go back to the game and replace the straight section of track then exit out to 8cars again and restore clearances. This crossing of tracks in the order describes will cause the rafts to do a 90 degree turn at that point heading toward the upper station. If you build it wrong they will just go in a circle around the top. 5)At this point you need to finish your rides course. Keep in mind that on most (is not all) water coasters all curves are in tunnels and all straight sections (including on ride lifts) are not. Also keep in mind this type of ride is supposed to be fast but not so fast that a raft leaves the course and crashes. 6)Time to test your building skills, exit out to 8cars and find your ride in the edit rides menu. Once there set the lift speed to 15mph. It's a good speed to get the rafts back to the top quickly and also a good speed for the lifts that are on the ride themselves. Put it on test and let them run for a while. 7)You will notice that they do not use the curved section of track at the top if the hill, instead they make a sharp turn toward the station. If they are using the curved track you messed up and need to go back a few steps and try again. 8)Take a good look at your rafts speeds at various places on the ride, if you want to make any changes to the rides course now is the time to do so! 9)Once your happy with your track it is time to rebuild it above the one you already built (20 game feet). This will be the track you will see in the game, the original you built will be made invisible later in this HOW TOO. So start at your lower station and build a section of track going up the lift and then back across the station to where the ride ends. Leave at least one blank section in front of the exit building. I left 3 blank in the version I made. These blank areas will be filled in with scenery later. 10)At this point you will need to exit back to 8cars and 0 Clearance Absolute again. Go back the the game and follow your lift up the hill, when you get to the top go ahead and follow the curve around until you hit your track again. 11)Once you hit your track delete the straight section again and continue through. You will notice that I switched back to lift hill track once I got past the crossover, that is because a real one would still be on a conveyor until it reaches the loading station. It will look like the rafts are on the conveyor but in reality they will be just floating at that point because of the normal track under it. Go back an remove the curve section of track and the crossover. You will notice in the game picture it looks like both crossover tracks are missing, that is just glitch caused by 8cars, the lower one is there and it will be seen in later pictures, DO NOT REMOVE IT! You will also notice the white section of track that is the section where the rides entrance will be and needs to be removed. 12)Continue along (with 0 Clearances active) following your original rides path until you reach the end of the ride. Be sure to keep tunnels and lift areas where they should be because this is the track you will be seeing in game. If you look closely you will notice that in the areas where the rides lifts start and stop I left on the normal track sections for one extra piece. I did that for a reason, while I really want the lift to take the raft all the way from the bottom of the hill to the very top I do not want it to look like they are. So the lift sections you will see in game are missing the very bottom and very top sections replaced by normal UN-TUNNELED track. Really...look at it! 13)OK, restore clearances and this should be your finished product, once again look at the on-ride lift areas (not the main lift) and notice how normal UN-tunneled sections were added to the bottom and top of each lift. You will also notice in this picture that the original track crossover at the top of the main lift is back, see I told you it was still there. 14)It's time to build the turntable, once again if you are not using a turntable you can skip ahead a few steps. We are going to build this in reverse, but make sure the track sections are going in the direction the ride will travel. Line up the turntable section with the secondary track (the blue one in the pictures) heading toward the upper station. 15)Build it up and around till you are right over the first turntable and build another one. 16)Remove all sections of the Log Flume except for the 2 turn tables. The one on top should be floating in space just about the other one (20 game feet). 17)Now comes the fun part and the part that will eat up a lot of the available rides/stalls for any game. For each section of track that is not curved you need to build a Heartline Twister coaster and since these coaster can't do curves you have to build a NEW one for each section. Start with the first one at the top of the ride. Build it only one section long, you only need the track piece that is transitioning from flat to down or from flat to up depending on if your heading up or down. DO NOT attempt to complete the sections at this time. EDIT: Read the post below this "How To" by Goliath513 to avoid having to use so many Heartline Twister coasters. 18)Keep placing a new Heartline Twister at each location in the direction the real ride will be traveling. Just do what the picture shows, only ONE section for right now. 19)Once you have all of them in place head out to 8cars and 0 Clearance Absolute and go back to the game. Since you have a clearances all messed up you CANNOT just click on any Heartline Twists you want. It's like they are not there so go to the parks ride list and pick the first one and hit construct. Follow the rides path from tunnel to tunnel. Rinse & Repeat for each of the other Heartlines till you have them all done. 20)Your new Water Coaster should look like this now. A big mess of tracks stacked on top of each other. 21)If you remember my Water Slide "How To" an issue was demonstrated about paths crossing the course of invisible ride tracks and all the work involved with fixing the problem. Well we are all smarter now and we know we need to build the paths NOW not LATER! So at this point you need to get your paths in. I went with a compact design that required a tone of 0 Clearance Absolutes to get it down to the bottom, while it is quite time consuming to do it this way is sure does take up a lot less space than a non 0 Clearance path wood and I highly recommend it. Don't forget about the exit stations path and any paths you think will go under or near the slide. 22)It's use 8cars like crazy time, first we need to exit to the trainer, next we need to find the ORIGANAL Dinghy Slide in the Edit Rides menu. Once you find it you need to change the Track Type to CROOKED HOUSE, the Operating Mode to BOAT HIRE and put a check mark in the Make Rides Invisible box. Hit Apply. Go back the game and it should look like this. Every part of the origanl ride should be invisible expect the entrance and exit. 23)Time to lower the track onto the invisible one to make it so the rafts look like they are on a course and not floating in the air. Exit back to 8cars and find the 2ND Dinghy Slide you built in the Edit Rides menu. Once you have found it all you need to do is lower it. So Put a check mark in Raise or Lower box adjust the movement to -2 (negative two) Main Color Scheme and hit apply. Now go back to the game and test it. The rafts should now be on the the track. You will notice that rafts 2-4 are stuck together, this is a side effect of the Boat Hire Mode and is not an issue, they will space out when you set the dispatch times. If for some reason the track is too high or too low you will need to go back to 8cars and make the necessary up or down adjustments, the example I used was based on the second slide being only 20 game feet above the original slide. 24)The turntable is next, color the one on TOP a different color... 25)Exit out to 8 cars and find the Log Flume in the Edit Rides menu, once there check the Raise or Lower box and set the Height Offset to -2 (negative two) Color Scheme Alternate 1 (one) and hit apply. This action should lower the top one onto the lower one. This is the final result if everything worked out. If not you will need to go back and make the necessary adjustments up or down to get it to look like this. 27)Now lets lower all the Heartline Twisters into position. Exit out to 8cars and find the first Heartline Twister. Put a check in the Raise or Lower box, set the Height Offset to -4 (negative four) Main Color Scheme and hit apply. Go back to the game and check if it lowered correctly. If it did exit back to 8cars and once again Rinse & Repeat for all the Heartline Twisters. When your done it should look like this. Once again if your off up or down you will need to adjust each one. The -4 (negative four) was based off of the track being placed 20 game feet off the track below it, and of course once the track below was lowered that distance doubled to 40 game feet. 28)Scenery time! Exit back out to 8cars and 0 Clearance Absolute. Now build your Water Coasters splash down area however you want. 29)This is the hardest part of this project, while still at 0 Clearances you have to build the start of your Water Coaster. It takes some time but once you get ONE item where you want it you can use that to help place the others using the control key. 30)The turntable will more than likely need some attention also and don't forget to color all the different rides it took to make this one attraction. ALL DONE! Now set your times based on how long the ride is and how many rafts you have and your good to go. If you want to adjust to rides ratings (I would recommend it) to something a bit more realistic compared to what RCT2 gave it use the SOB trainer and make it as exciting as it should be.
-
First off, thanks for the compliment, PBWP was a fun learning experience. Secondly, if you are going to make this functional and you plan on having a lazy river I suggest you start with that. It has a lot of underground work that need to be done and while the park is empty it would be best to get that out of the way. You don't need to build the entire ride but at least get the all the stations, and merges done before you put things like paths and water on top of the map and can't see what your doing. Once that is done you can build all over the place and it will not matter, everything is on the surface at that point. I do wish you luck with the water park, and I hope you give making it functional a try. It can really take a cool but boring dead looking part of a park and turn it into a really cool lively addition. Just PM me if you have any problems or questions.
-
Official RCT/RCT2 Help Thread
dmaxsba2408 replied to Stoksy's topic in Roller Coaster Games, Models, and Other Randomness
^ I am really not understanding what problem you are having downloading rides/objects for the game. I also don't see how a VIDEO of this will help you at all. Here is everything you need to know about putting objects in RCT2. If there is part you don't quite understand I will try to explain it again. When you go to a site like AMAZING EARL'S and pick something out you want, it doesn't matter if it is a ride or scenry or both, you simply save it to your desktop or some predetermined folder. Once you have it on your computer you need to open the ZIP file. Inside the ZIP you will either see DAT's or a folder, if it is a folder the DAT's will be inside. Here is where things may be different from person to person. Everyone may not use the same type of ZIP program. One way or another you need to get the files/folders out of the ZIP and into your RCT2 game. You can highlight, copy and paste them, or drag and drop them or use the ZIP's extract functions. YOUR CHOICE! The path to RCT2 for extracting from the zip or placing them in RCT2 by hand is the same. My Computer...Local Disc (?)*...Program Files...Infogrames Interactive**...RCT2...Objdata. *Local Disc, mine is ©. Yours may be different. Just use the one you have RCT2 installed on. **If you are running the Triple Thrill Pack, it will be Atari not Infogrames Interactive. Once you have the items from the ZIP in your Objdata folder, do a double check and make sure you don't have any type of folders, pictures or text documents inside. This can be done simply by using the View tab at the top of the Objdata folder and selecting Arrange Icons by TYPE. If you have any folders inside the Objdata folder open them up and copy and paste it's contents back into the Objdata folder then remove the folder to the Recycle Bin. If you find any pictures or text documents remove those to the Recycle Bin also. Now your ready to start your game and get the items officially install in RCT2. When you start the game a Checking Objdata bar will show up, what it is doing is arranging the new items, this takes quite awhile some times so relax have some cookies and let the game do it's thing. Once loaded the normal LOADING bars will show up and your game will start. To find the new ride/scenery you just installed you have to go the Scenario Editor. Once there open a new landscape and search for your items. FOR DOWNLOADING A PARK...when you download a park it will more often than not have custom objects in it. You may or may not like these items, so ALWAYS keep a back up of your Objdata folder saved somewhere safe on your computer, and if you download a park that has items you want to keep, make sure you update your saved Objdata folder. If you did not like what came with the park just remove your current Objdata folder and replace it with your back up. If the park you downloaded includes DAT's in the ZIP along with the park itself those DAT's need to be placed in the Objdata folder by hand. They are called non-exporting and will not download into the game automatically and the park will not open without them. So put them in the game (as explained above) and then open the park. The Checking Objdata bar will show up then you will see a bunch of flashing bars show up with DAT names on them. Once those are done, another Checking Objdata bar will show up. Once finished the usual loading bars will come and go and the park will open. ERROR TRAPPER's while loading parks... Sometimes while loading a park it take the game to long to load and it will ERROR TRAP. Don't worry about it. Hit OK and try again. 99% of the time it will load on the second try. -
Please do, and if you need any help please ask. It really is not that difficult once you do it a few times.
-
Will this be a working waterpark? > Me hopes so.
-
Project S (RCT2)
dmaxsba2408 replied to Stoksy's topic in Roller Coaster Games, Models, and Other Randomness
^ 100% agree, about the only thing that could make that any better was if you ugly it up a bit. In other words make it look like there is a battle going on, rough it up, get it dirty looking. -
I do for the most part like what I see. I have to agree about the support issue, I can't think of any suspended coaster that has the supports on the outside of a curve. I know the game does it sometimes but that still doesn't make it make sense. Sure in real life they look like they are swinging right at some of the supports but in reality they always swing away before you get there. The only exception is where the supports are on both sides. How about putting down a single support base at several points inside the curve and have more than one support angle off of it connecting to the track a at least 2 points per support base. Like Millenniumfan94 mentioned. the other problem I am having is with the hills. There are no hills like what you have in this park anywhere in Florida or for that matter in any southern states near the ocean. If you just change the name to Los Angeles, San Francisco, Seattle, Boston, New York or some other coastal city that might be able to support hills like that so close to the water this hole park will be better off. PLEASE, I am begging you and everyone else to STOP uploading pictures as BMP's, even with cable this and all the other new(er) member park topics are loading way to slow. Please switch them over to JEPG, it only takes a few minutes of your time and saves a lot of time for everyone else.
-
Official RCT/RCT2 Help Thread
dmaxsba2408 replied to Stoksy's topic in Roller Coaster Games, Models, and Other Randomness
Well, if that did the trick your CD must have an issue. So I would suggest you keep a back up of the file somewhere safe (away from your RCT2 folder) so if you ever have to un-install the game and then re-install it you will always have a good copy to put in the bad one's place. In other words... JUST DON'T LOOSE IT! -
Project S (RCT2)
dmaxsba2408 replied to Stoksy's topic in Roller Coaster Games, Models, and Other Randomness
^^ Yes the ParkDat is on Page 9 in the Help Thread. You know I forgot all about Sunrise Point, it's in my parks folder will have to give it a try again. I also found some webbing scenery, if you want to give it look. Don't know if any of it will do you any good but I will add it to this post so you can one of the preview programs to check it out and see if what you think. The figures are in there also in case someone else wants to see them or use them in their parks. EDIT: as for Sunrise Point I am still missing objects. According to the ParkDat only 3 at this point. jaSagS03 jaSagS04 JATIPMar spider dats.zip